Why Start a Vegetable Garden? The Joys of Growing Your Own Food

Have you ever walked past a farmer’s market, marveling at the vibrant colors and incredible freshness of the produce? What if I told you that you could bring that same freshness right to your own backyard? Starting a vegetable garden might sound daunting, but it’s one of the most rewarding hobbies you can pick up. It’s not just about saving money (though that’s a nice bonus!), it’s about connecting with nature, understanding where your food comes from, and enjoying the unparalleled taste of vegetables picked at their peak.
Imagine stepping outside your door to pluck ripe tomatoes for a salad, crisp lettuce for a sandwich, or fragrant herbs for your favorite dish. It’s a simple pleasure that brings immense satisfaction. Plus, it’s a fantastic way to get some gentle exercise and fresh air. Whether you have a sprawling yard or just a small balcony, there’s a way for everyone to experience the magic of growing their own food. This guide is designed to take you from a complete novice to a confident gardener, breaking down the process into simple, manageable steps.
The Benefits Beyond the Plate
-
Unbeatable Freshness & Flavor: Vegetables lose nutrients and flavor the moment they’re harvested. When you grow your own, you eat them at their absolute best.
-
Healthier Eating: Having fresh produce readily available often encourages us to eat more vegetables, boosting our intake of vitamins and fiber.
-
Cost Savings: While there’s an initial investment, growing your own can significantly reduce your grocery bills over time, especially for organic produce.
-
Reduced Environmental Impact: Growing locally cuts down on transportation emissions and packaging waste associated with commercially grown produce.
-
Stress Relief & Physical Activity: Gardening is a proven stress reliever and provides a gentle form of exercise.
-
Educational Opportunity: It’s a wonderful way to teach children (and adults!) about nature, biology, and healthy eating.
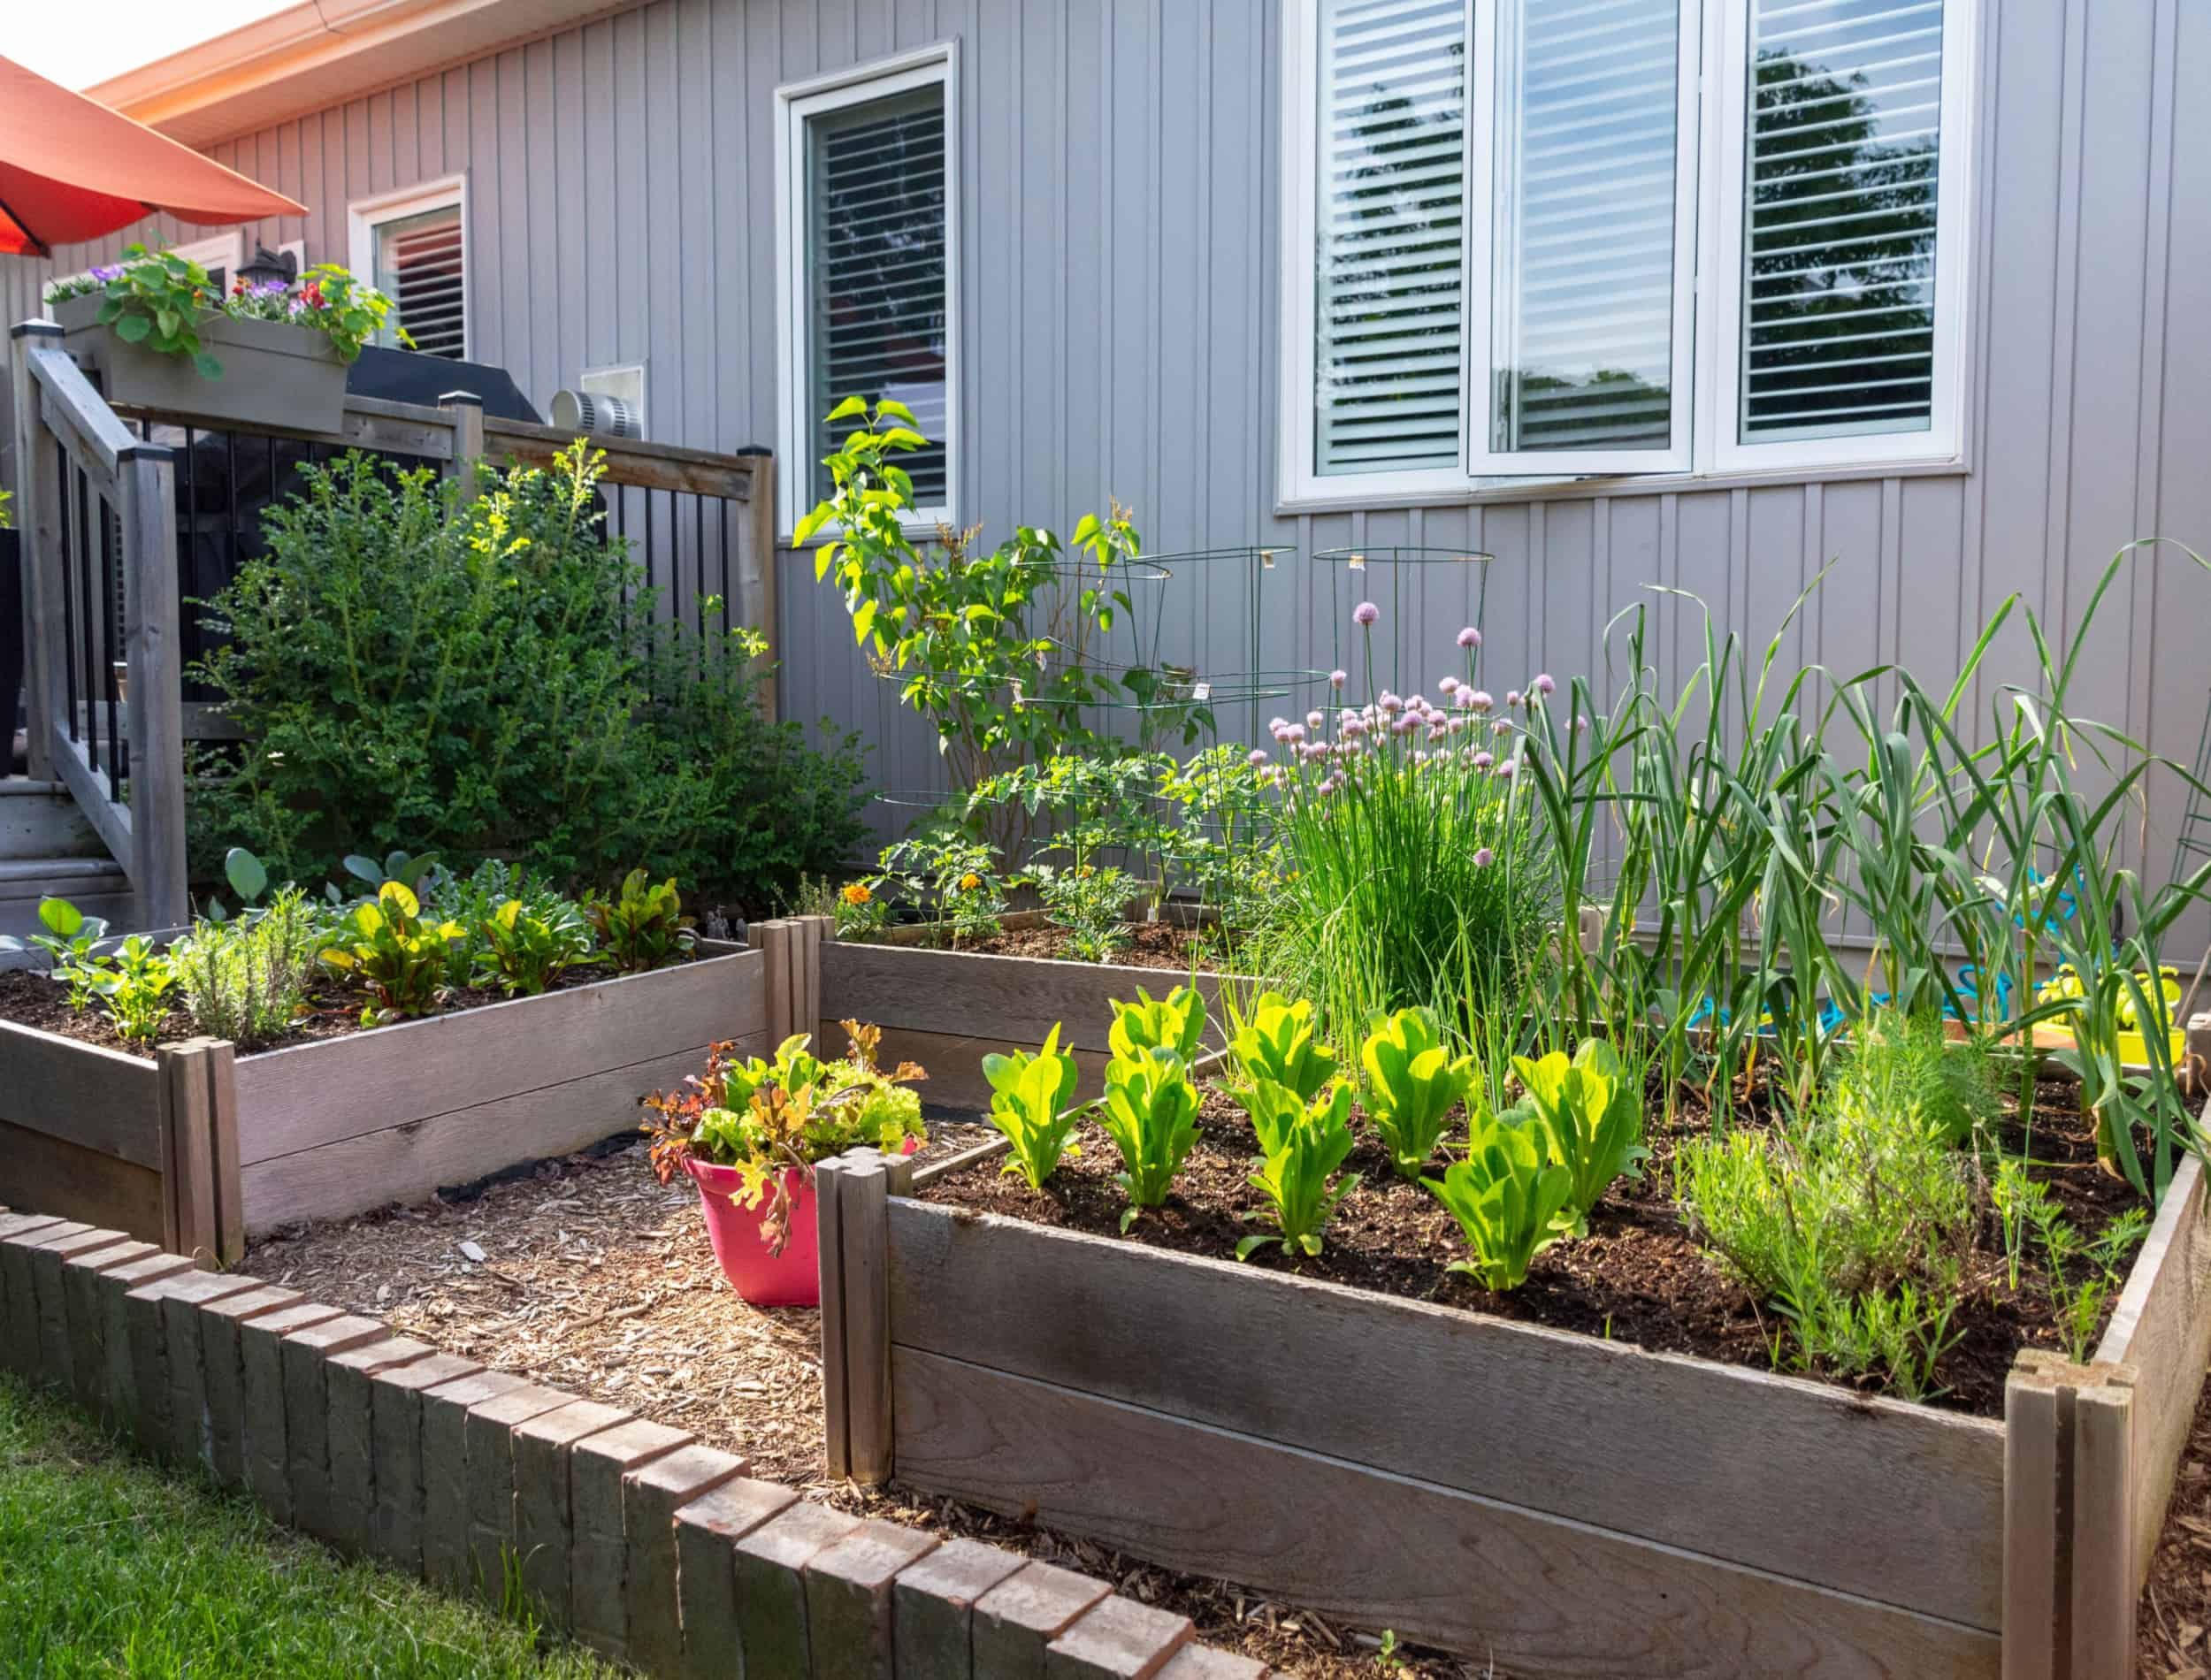
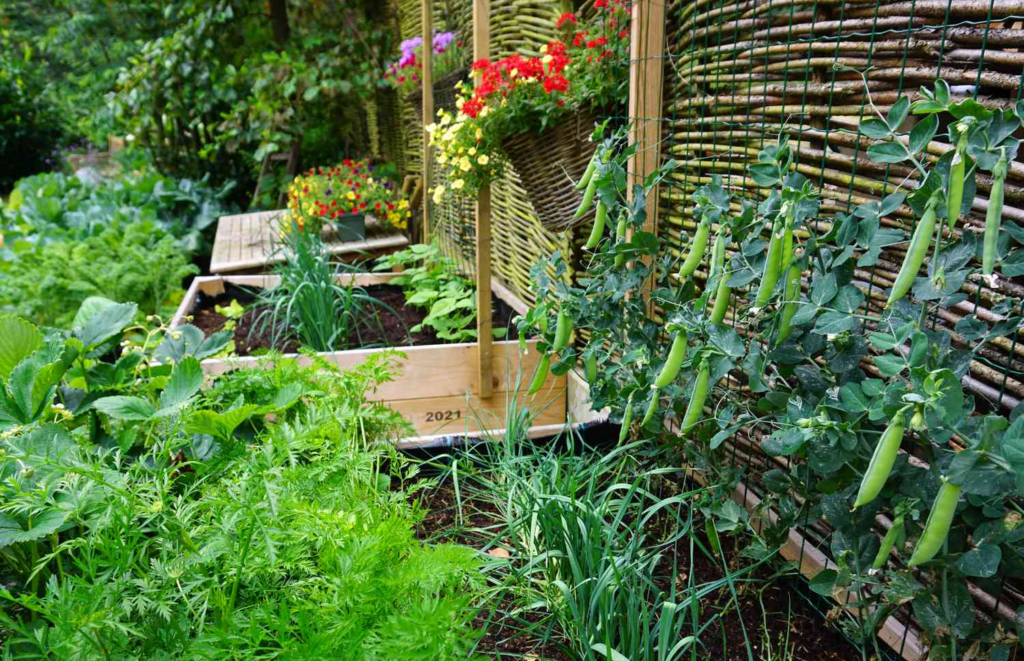
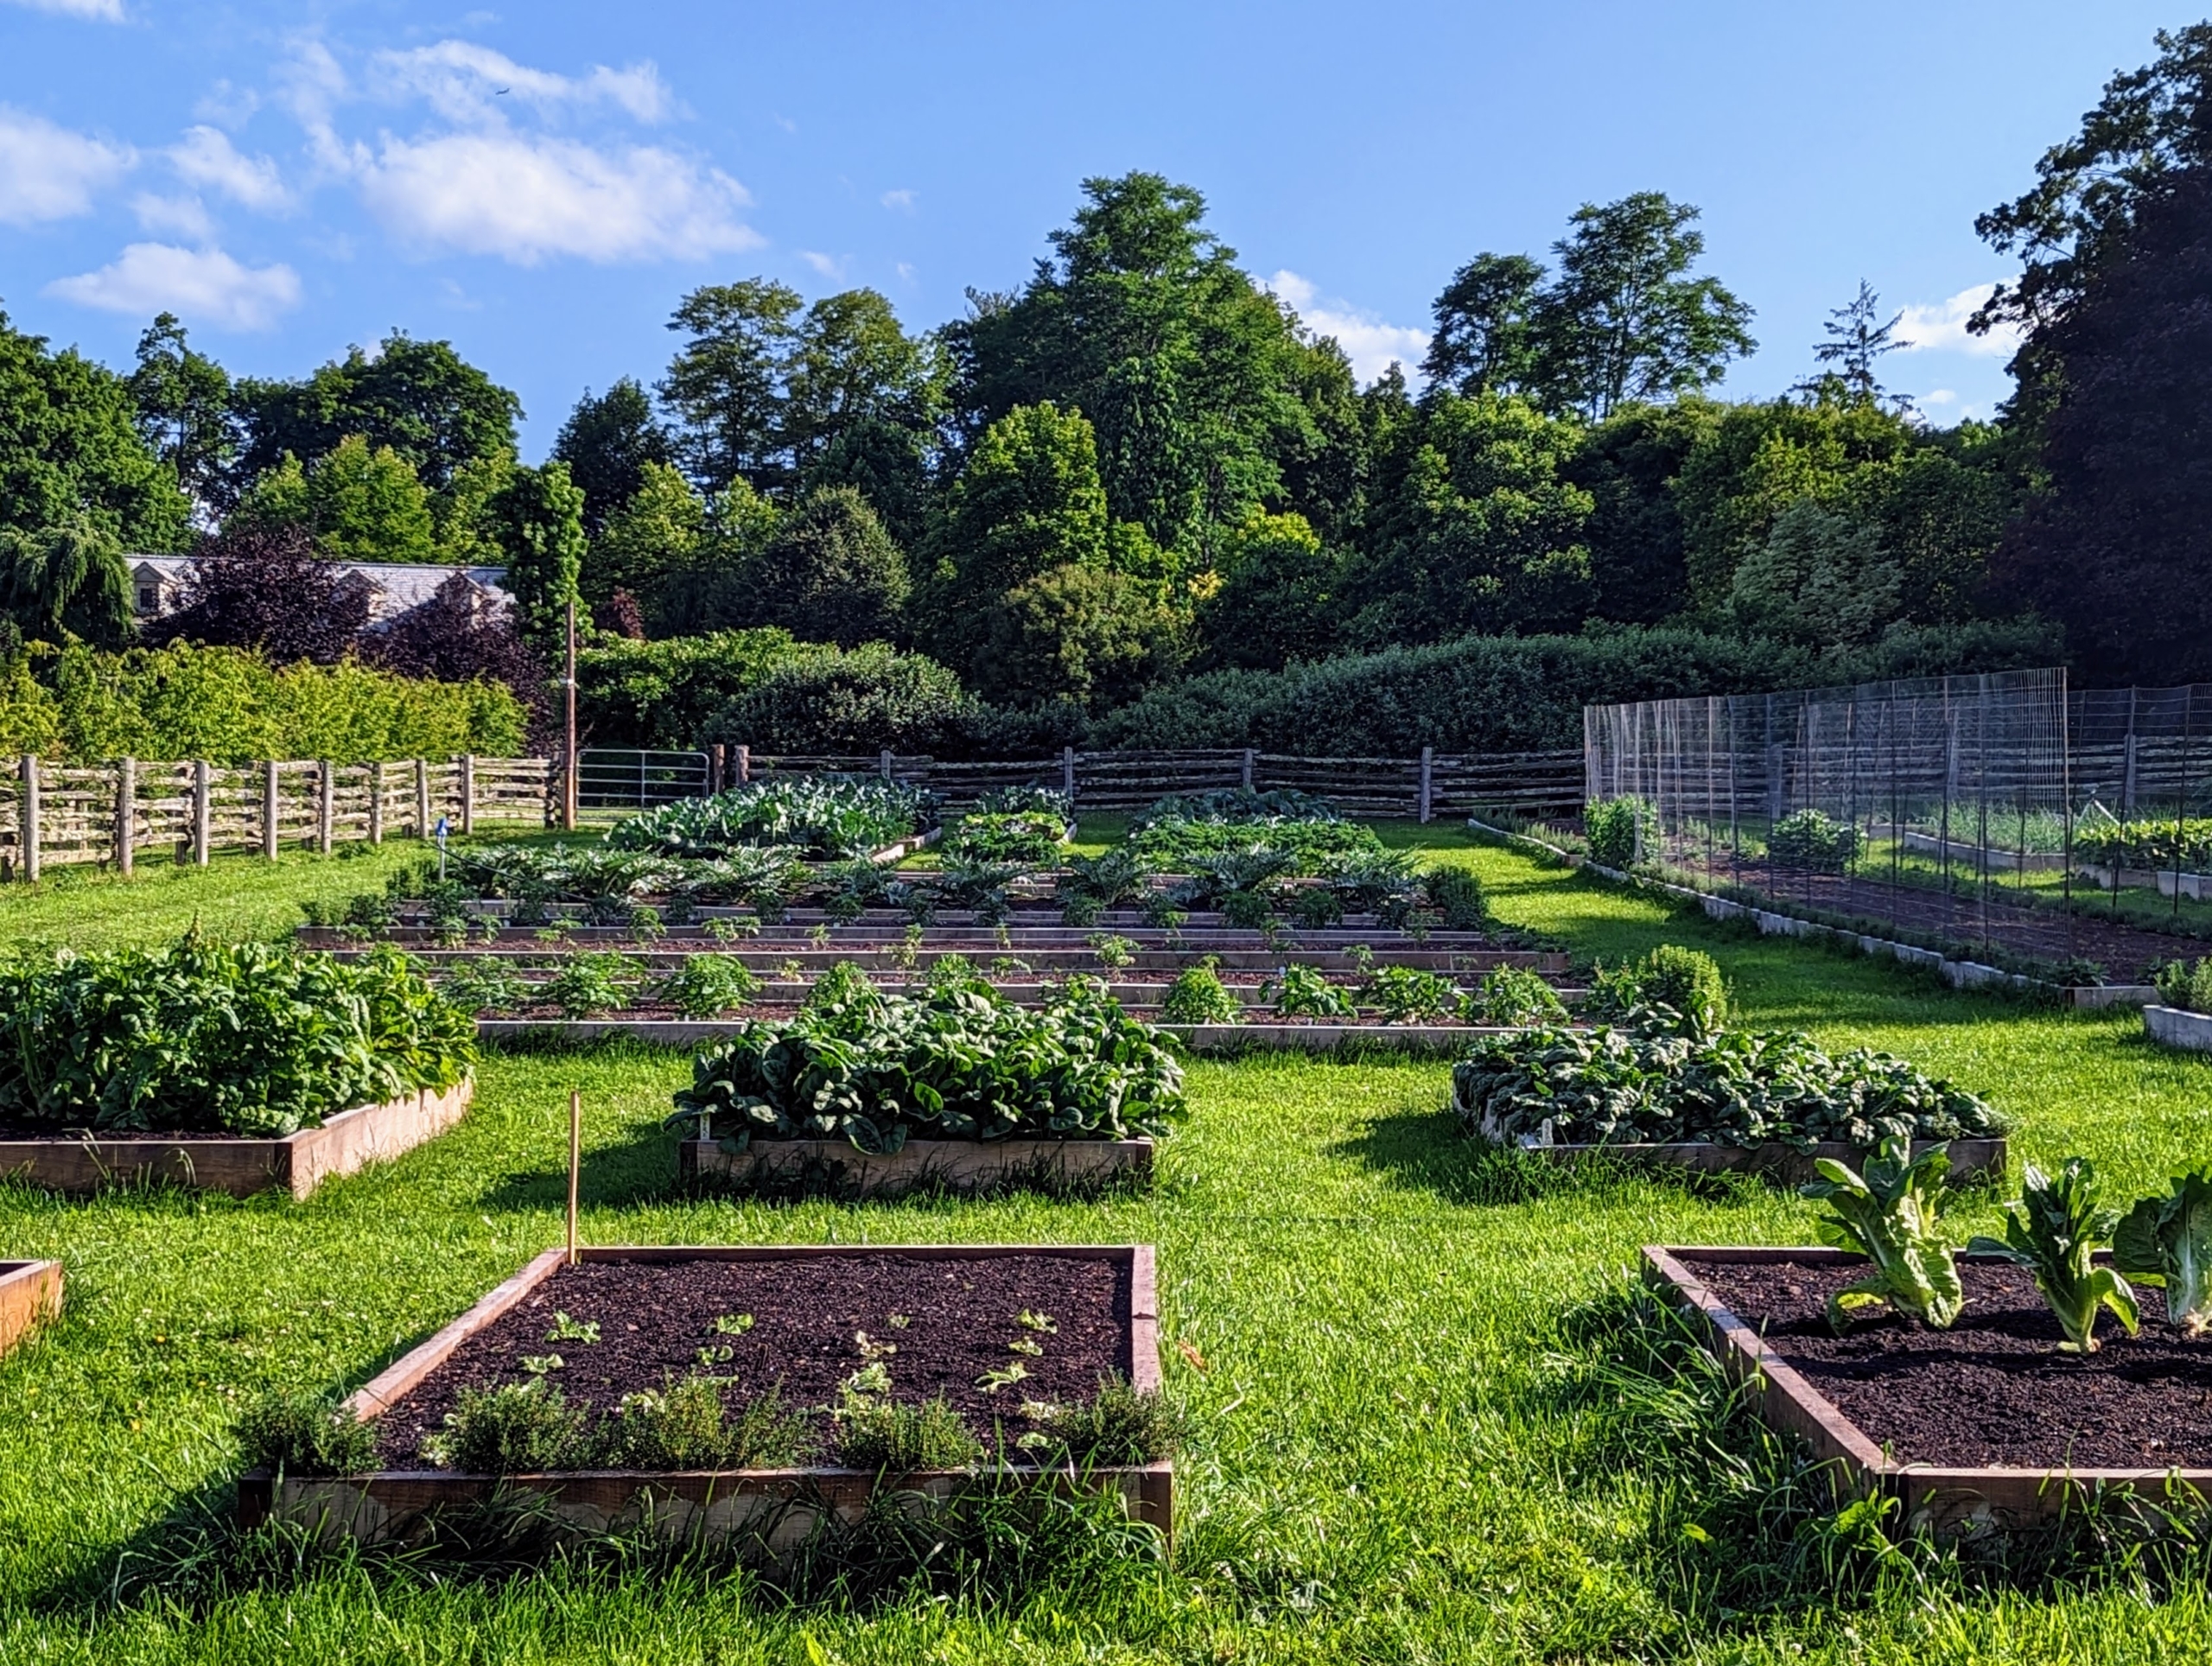
Step 1: Choosing the Perfect Spot for Your Vegetable Garden
This is arguably the most crucial step. Where you place your garden will significantly impact your plants’ success. Most vegetables need a good amount of sunlight to thrive.
Sunlight is Key: How Much Do Your Plants Need?
-
Full Sun (6-8+ hours of direct sunlight per day): This is the sweet spot for the majority of popular vegetables like tomatoes, peppers, cucumbers, squash, beans, corn, and melons. They need this sustained energy to produce flowers and fruit.
-
Partial Sun/Shade (4-6 hours of direct sunlight per day): If your yard doesn’t get full sun, don’t despair! Leafy greens like lettuce, spinach, kale, and Swiss chard, as well as root vegetables like carrots and radishes, can still do well in these conditions. They might grow a bit slower but will still be productive.
Pro Tip: Observe your yard throughout the day. Note which areas receive the most sun and for how long. Morning sun is generally gentler and preferred by many plants over intense afternoon sun, especially in hotter climates.
Location, Location, Location: Beyond Sunlight
-
Accessibility: Choose a spot that’s easy to get to. You’ll need to water, weed, and harvest regularly. If it’s a hassle to reach, you’re less likely to tend to it.
-
Water Source: Is there a hose bib nearby? Lugging heavy watering cans long distances gets old fast. Proximity to water makes maintenance much easier.
-
Soil Quality: While you can amend most soils, starting with a spot that has decent-looking soil (not pure clay or rock) is a plus. Avoid areas where water pools after rain, as this can lead to root rot.
-
Protection: Consider windbreaks (like a fence or shrubs) if you live in a very windy area, as strong winds can damage delicate plants. Also, think about potential pests like deer or rabbits; fencing might be necessary.
-
Level Ground: A relatively flat area is easiest to work with for planting and watering.
Garden Types: Finding What Fits Your Space
-
In-Ground Beds: The traditional method. You’ll be planting directly into the earth. This works best if you have good soil and a decent amount of space.
-
Raised Beds: These are frames (made of wood, metal, or stone) filled with soil. They offer excellent drainage, warm up faster in spring, and can be easier on your back. They are perfect for areas with poor native soil or if you want a more defined garden space. You can buy kits or build them yourself.
-
Container Gardening: Ideal for small spaces like balconies, patios, or even windowsills. Almost any vegetable can be grown in a container, provided the container is large enough and has drainage holes. Choose pots, grow bags, or recycled containers.
Step 2: Preparing Your Soil – The Foundation of Your Garden
Healthy soil is the lifeblood of a thriving vegetable garden. It provides nutrients, water, and air to your plants’ roots. Don’t skip this step!
Understanding Your Soil
If you have in-ground beds or are using raised beds, you’ll want to assess and improve your soil.
-
Drainage Test: Dig a hole about a foot deep and fill it with water. Let it drain, then fill it again. If the second filling drains within a few hours, your drainage is good. If it takes longer, you’ll need to amend the soil to improve drainage.
-
Texture Test (Optional but helpful): Grab a handful of moist (not wet) soil and squeeze it.
-
If it forms a tight, sticky ball that doesn’t crumble, you likely have heavy clay soil.
-
If it feels gritty and falls apart easily, it’s sandy.
-
If it forms a ball that crumbles slightly when poked, you have loamy soil – the ideal!
Amending Your Soil: The Magic Ingredient – Compost!
Regardless of your soil type, adding organic matter is the single best thing you can do. Compost is decomposed organic material (like kitchen scraps, leaves, and grass clippings) that enriches the soil.
-
For In-Ground Gardens: Spread a generous layer (3-6 inches) of compost over the area. You can either till it into the top 6-8 inches of soil or simply leave it on top as a mulch, allowing worms and microorganisms to incorporate it over time (no-dig method).
-
For Raised Beds: Fill them with a quality soil mix. A common blend is 60% topsoil, 30% compost, and 10% other amendments like peat moss or vermiculite for drainage and aeration. You can buy pre-mixed raised bed soil or create your own blend.
-
For Containers: Use a high-quality potting mix specifically designed for containers. Never use garden soil in pots, as it compacts too easily and hinders drainage. Potting mix is lighter and provides better aeration.
Other Soil Amendments to Consider:
-
Aged Manure: Provides nutrients but should be well-composted to avoid burning plants.
-
Peat Moss or Coconut Coir: Improves moisture retention and aeration.
-
Perlite or Vermiculite: Enhances drainage and aeration.
-
Worm Castings: A super-rich, natural fertilizer.
Key Takeaway: Aim for soil that is dark, crumbly, and smells earthy. If you’re unsure, a soil test kit from a local garden center or extension office can give you a detailed analysis of your soil’s nutrient levels and pH.
Step 3: Choosing Your Vegetables – What to Grow?
Now for the fun part! Deciding what delicious vegetables you want to harvest. As a beginner, it’s wise to start with easier-to-grow varieties.
Easy Veggies for Beginners:
These are generally forgiving, productive, and don’t require overly specialized care.
-
Leafy Greens: Lettuce (loose-leaf varieties are easiest), spinach, kale, Swiss chard. They grow relatively quickly and can tolerate some shade.
-
Radishes: Super fast growers! You can go from seed to harvest in under a month.
-
Bush Beans: Productive and don’t require trellising.
-
Peas: Prefer cooler weather and can be grown vertically.
-
Zucchini & Summer Squash: Famously prolific – you might end up with more than you know what to do with! Plant just one or two plants.
-
Carrots: Grow well in loose, deep soil.
-
Tomatoes (Certain Varieties): Choose “determinate” or “bush” varieties for containers or smaller spaces. Cherry tomatoes are often very productive and forgiving.
-
Herbs: Basil, parsley, cilantro, mint (plant mint in a container, it spreads aggressively!).
Factors to Consider When Choosing:
-
Your Climate & Growing Season: Know your first and last frost dates. Some vegetables need a long, warm season (like peppers and eggplant), while others prefer cooler weather (like broccoli and peas).
-
Sunlight Availability: Match your plant choices to the amount of sun your chosen spot receives (as discussed in Step 1).
-
Space: Vining plants like cucumbers and some tomatoes need trellising or lots of space. Bush varieties are more compact. Check the mature size of the plant.
-
What You Actually Eat: There’s no point growing pounds of kale if no one in your household will eat it! Start with things your family enjoys.
-
Time Commitment: Some plants require more attention than others. If you’re very busy, opt for lower-maintenance options.
Seeds vs. Transplants (Starts)
-
Seeds: Cheaper, offer a wider variety of choices, and give you the satisfaction of starting from scratch. However, they require more patience and care initially. Some vegetables (like carrots, radishes, beans, corn) are best sown directly into the garden.
-
Transplants (Starts): Small plants already started by a nursery. They give you a head start and are great for vegetables with longer growing seasons (like tomatoes, peppers, eggplant) or if you’re starting late. They are more expensive than seeds.
Recommendation for Beginners: Start with a mix. Direct sow easy seeds like lettuce, radishes, and beans. Buy transplants for tomatoes and peppers.
Step 4: Planting Your Vegetables – Getting Them in the Ground
Once your soil is prepped and you’ve chosen your plants, it’s time to plant! Timing is important here.
When to Plant:
-
Know Your Frost Dates: Your local extension office or a quick online search can tell you your average last spring frost date and first fall frost date. This defines your growing season.
-
Cool-Season Crops: These vegetables prefer cooler temperatures (spring and fall). Examples include lettuce, spinach, peas, broccoli, carrots, radishes. Many can be planted a few weeks before your last frost date.
-
Warm-Season Crops: These need warmth and are sensitive to frost. Plant them after all danger of frost has passed and the soil has warmed up. Examples include tomatoes, peppers, cucumbers, squash, beans, corn.
Planting Seeds:
-
Read the Seed Packet: This is your instruction manual! It tells you planting depth, spacing, and germination time.
-
Follow Spacing Guidelines: Overcrowding leads to poor air circulation, disease, and smaller harvests. Give plants room to grow.
-
Planting Depth: A general rule is to plant seeds at a depth equal to 2-3 times their diameter. Tiny seeds need to be very shallow.
-
Water Gently: After sowing, water the area gently so you don’t wash the seeds away. Keep the soil consistently moist until germination.
Planting Transplants (Starts):
-
Harden Off: If you bought transplants or started them indoors, they need to gradually adjust to outdoor conditions (sun, wind, temperature fluctuations) over 7-10 days before planting. Start with a few hours in a sheltered spot and increase exposure daily.
-
Dig a Hole: Dig a hole slightly larger than the transplant’s root ball.
-
Gently Remove Plant: Carefully slide the plant out of its container. If the roots are tightly circling (root-bound), gently tease them apart.
-
Place in Hole: Set the plant in the hole so the top of the root ball is level with the surrounding soil. (Exception: Tomatoes can often be planted deeper, as they will grow roots along the buried stem).
-
Backfill & Water: Fill the hole with soil, gently firm it around the base of the plant, and water thoroughly. This helps settle the soil and eliminate air pockets.
Tip: Planting on an overcast day or in the late afternoon can reduce transplant shock.
Step 5: Watering Your Garden – Consistency is Key
Proper watering is crucial for plant health and productivity. Too much or too little can cause problems.
How Much Water?
-
General Rule: Most vegetable gardens need about 1 inch of water per week, either from rain or irrigation. This can vary depending on weather (hot, dry spells require more), soil type (sandy soil drains faster and needs more frequent watering), and plant stage (seedlings and fruiting plants need consistent moisture).
-
Check the Soil: The best way to know if you need to water is to feel the soil. Stick your finger about 2 inches deep. If it feels dry, it’s time to water. If it’s moist, wait.
When and How to Water:
-
Water Deeply and Infrequently: Encourage deep root growth by watering thoroughly until the soil is moist several inches down. Frequent, shallow watering leads to weak, shallow root systems.
-
Water the Base of Plants: Aim water at the soil level, not the leaves. Wet foliage can encourage fungal diseases. Soaker hoses or drip irrigation are very efficient methods.
-
Water in the Morning: This is the ideal time. It allows plants to hydrate before the heat of the day and gives foliage time to dry, reducing disease risk. Evening watering is the next best option, but avoid watering late at night if possible.
-
Avoid Overwatering: Soggy soil deprives roots of oxygen and can lead to rot. Ensure good drainage.
Container Gardening Watering: Plants in containers dry out much faster than those in the ground, especially in hot weather. They may need watering daily. Always check the soil moisture.
Step 6: Weeding and Mulching – Keeping Your Garden Clean and Healthy
Weeds compete with your vegetables for water, nutrients, and sunlight. Mulching helps suppress weeds and retain moisture.
Weeding Strategies:
-
Weed Early and Often: It’s much easier to pull small, young weeds than large, established ones. Make it a quick daily or every-other-day task.
-
Pull When Soil is Moist: Weeds come out more easily when the ground is damp.
-
Get the Roots: Ensure you pull the entire root system, otherwise, many weeds will regrow.
-
Tools: A hand trowel, hoe, or specialized weeding tool can be helpful.
The Power of Mulch:
Mulch is a layer of material applied to the soil surface. It offers numerous benefits:
-
Weed Suppression: Blocks sunlight, preventing weed seeds from germinating.
-
Moisture Retention: Reduces evaporation from the soil surface.
-
Temperature Regulation: Keeps soil cooler in summer and warmer in winter.
-
Soil Improvement: Organic mulches (like straw, shredded bark, compost) break down over time, adding nutrients to the soil.
Best Mulch Options for Vegetable Gardens:
-
Straw: A popular choice for many vegetables, especially tomatoes and peppers. Use clean, weed-free straw (not hay, which contains seeds).
-
Shredded Bark or Wood Chips: Good for pathways or around larger plants, but can tie up nitrogen initially.
-
Compost: A fantastic dual-purpose mulch that feeds the soil.
-
Grass Clippings: Use in thin layers to avoid matting and potential disease. Ensure they are free of herbicides.
How to Apply Mulch: Apply a layer 2-4 inches deep around your plants, leaving a small gap around the base of the stems to prevent rot.
Step 7: Feeding Your Plants – Fertilizing for Growth
While good soil provides a solid foundation, many vegetables benefit from supplemental feeding, especially during their active growing and fruiting stages.
When to Fertilize:
-
Transplanting: A light feeding when transplanting can help plants establish.
-
Growth Stages: Fertilize again when plants start actively growing, flowering, or producing fruit.
-
Follow Plant Needs: Some plants are heavy feeders (tomatoes, corn, squash), while others need less (root vegetables, beans).
Types of Fertilizers:
-
Organic Fertilizers: Derived from natural sources like compost, aged manure, bone meal, fish emulsion, and seaweed extract. They release nutrients slowly and improve soil structure over time.
-
Synthetic (Chemical) Fertilizers: Provide nutrients quickly but don’t improve soil health. Use with caution to avoid over-fertilizing, which can harm plants and the environment. Look for balanced N-P-K ratios (Nitrogen-Phosphorus-Potassium) or formulations specific to vegetables.
How to Fertilize:
-
Follow Product Instructions: Always read and follow the label directions carefully regarding application rates and frequency. Over-fertilizing can “burn” plants.
-
Side-Dressing: For in-ground gardens, you can apply fertilizer around the base of plants (a few inches away from the stem) and gently scratch it into the top layer of soil, then water it in.
-
Liquid Fertilizers: Can be applied during watering for quick nutrient uptake, especially beneficial for container plants.
Beginner Tip: Start with compost-rich soil. You might find that with good soil preparation, you only need minimal supplemental fertilizer, especially for the first year. Observe your plants; yellowing leaves can indicate a need for nitrogen, while poor flowering might suggest a need for phosphorus.
Step 8: Pest and Disease Management – Keeping Your Garden Healthy
Even the best-laid plans can encounter challenges. Learning to identify and manage common garden pests and diseases is part of the gardening journey.
Prevention is Key:
-
Healthy Soil & Plants: Strong, healthy plants grown in good soil are more resistant to pests and diseases.
-
Proper Spacing: Good air circulation helps prevent fungal issues.
-
Crop Rotation: Avoid planting the same type of vegetable in the same spot year after year. This helps prevent soil-borne diseases and pests from building up.
-
Water Wisely: Avoid wetting foliage unnecessarily.
-
Cleanliness: Remove dead or diseased plant material promptly. Keep tools clean.
Common Pests and How to Deal with Them:
-
Aphids: Tiny, pear-shaped insects often found in clusters on new growth.
-
Solution: Blast them off with a strong spray of water. Encourage beneficial insects like ladybugs. Use insecticidal soap if necessary.
-
Cabbage Worms: Green caterpillars that munch holes in leafy greens.
-
Solution: Handpick them (they’re easy to spot). Use Bacillus thuringiensis (Bt), a natural bacterium safe for other wildlife.
-
Slugs & Snails: Leave slimy trails and chew holes in leaves and fruit.
-
Solution: Handpick them, especially in the early morning or evening. Use barriers like copper tape or diatomaceous earth. Beer traps can also work.
-
Tomato Hornworms: Large green caterpillars that can defoliate a tomato plant quickly.
-
Solution: Handpick them – they are large and noticeable. Bt is also effective.
Common Diseases and How to Deal with Them:
-
Powdery Mildew: A white, powdery coating on leaves, common in humid conditions.
-
Solution: Improve air circulation. Water at the base. Remove affected leaves. Fungicidal sprays (organic options available) can help.
-
Blight (Early/Late): Affects tomatoes and potatoes, causing spots and wilting.
-
Solution: Choose resistant varieties. Practice crop rotation. Remove and destroy infected plants (do not compost).
Integrated Pest Management (IPM): This approach emphasizes prevention and uses the least toxic methods first. It involves monitoring your garden regularly, identifying problems accurately, and using a combination of methods (biological, cultural, physical, and chemical) only when necessary.
Step 9: Harvesting Your Bounty – The Sweet Reward!
This is what all your hard work has been leading up to! Harvesting at the right time ensures the best flavor and encourages plants to produce more.
Knowing When to Harvest:
-
Check Ripeness Indicators: Each vegetable has its signs.
-
Tomatoes: Firm, full color (red, yellow, orange, etc., depending on variety), slightly soft to the touch.
-
Peppers: Firm, glossy skin. Color depends on variety (green, red, yellow).
-
Cucumbers: Firm, uniformly colored, before they become overly large and seedy.
-
Zucchini: Harvest when they are young and tender (6-8 inches long). Overgrown zucchini become watery and less flavorful.
-
Lettuce/Greens: Harvest outer leaves as needed (“cut and come again”) or the whole head when mature.
-
Beans: Plump pods, before the seeds inside bulge significantly.
-
Root Vegetables (Carrots, Radishes): Check the size of the tops or gently pull one to gauge maturity.
-
Harvest Regularly: Picking ripe produce signals the plant to produce more. Letting vegetables get overripe can slow down production.
Harvesting Techniques:
-
Use Clean Tools: A sharp knife, pruners, or scissors make clean cuts and prevent damaging the plant.
-
Handle Gently: Avoid bruising fruits and vegetables.
-
Morning Harvest: Produce is often crisper and holds moisture better when harvested in the cool morning hours.
-
“Cut and Come Again”: For leafy greens like lettuce